10/31/14

Reese's White Chocolate Popcorn


Happy Halloween!

For the past several years, I've had this obsession with making white chocolate popcorn.  It is delicious, super easy and there are tons of variations.

This Halloween we are going with white chocolate popcorn drizzled in dark chocolate with Reese's Pieces sprinkled throughout.

Super healthy, I know.

The hardest part of making this snack - dodging my dogs as they were dancing around the kitchen and hoping that I would drop something.  They are huge fans of popcorn.  They are NOT huge fans of Halloween costumes, just in case you were wondering.


Yep - I'm that pet parent.  Their shame is well worth my entertainment.

If you have twenty minutes to spare this holiday season, you can put together this delicious snack with three or four ingredients that you probably already have in your pantry.  And there really isn't any "cooking" involved.  Unless you count melting chocolate chips in the microwave as cooking.


You will need:

  • 1 bag of popcorn
  • 1 1/2 cups white chocolate chips
  • 1/2 cup dark chocolate chips
  • 1 cup Reese's Pieces

To start, pop a bag of popcorn (or you can be fancy and make it the old-fashioned way, but I don't have the patience for that mess).  Make sure that you get all of the unpopped kernels out of the bowl.


Next, melt the white chocolate chips by placing them in a microwave safe bowl and heating for 15-second intervals until fully melted.

Pour the melted chocolate over your bowl of popcorn, and mix together with a large plastic spoon.  You may need to coat the spoon in non-stick spray, as this does tend to get rice-krispy-treat messy.  Throw in as many Reese's Pieces as you feel necessary (roughly a cup did it for me), and spread out onto a cookie sheet covered in wax paper.


If you want to add a little more pizzazz (and I always do), melt dark chocolate chips in a microwave safe bowl in 15-second intervals until melted.  Take a fork and drizzle the melted chocolate over the popcorn.  Your finished product should look something like this:


Now it just needs to set.  You can leave it out for around 15 minutes, or place it in the fridge if you want it to harden a bit faster.  Just break it into pieces, place in a bowl and munch away!


I warn you - this stuff is addictive.  And you may also hate regular popcorn after having eaten it covered in this sugary goodness.

Have a safe and happy Halloween!

Jordan


Read More »

10/27/14

Patio Love

I purchased my first home at the beginning of 2011, and I've learned a lot. Both about home ownership in general and about myself.

This past summer, my dad came over to help me dig some particularly stubborn weeds from the base of a tree in my front yard.  Which is how all 26-year-old women want to spend their Saturday afternoons.

When we were finished weeding, my dad was standing in the driveway watching as I attempted to drag my giant trash can filled with weeds from the grass onto the driveway, got stuck several times and almost fell over. Once I made it up to where he was standing, he stared at me and said: you're a condo person.

He's totally right.

Buying my first house has taught me that I. Hate. Yard. Work.

Mowing, weeding, planting things.  I kill just about everything (succulents and cacti aside - because, really, who can kill those?).  If anyone gives me plant life or flowers of any sort, I immediately give them to my mom. Because they are doomed to die a slow and painful death if they reside anywhere near my house.

So lately I've been dreaming of patios.

My house has a large deck and a small lawn, and I've sat out there maybe 10 times in three years.  It's uncovered, and there are bugs.  Like tons of bugs.  As in I've tried every type of candle/spray to get rid of the mosquitoes, spiders, bees and wasps that are constantly hovering around my deck, and nothing seems to work.

Lesson learned: I am not a lawn person.

I am, however, a patio person.  My next move is probably going to be purchasing a condo, where I dream of having a small patio like one of these:


I have two dogs, so I realize that I need some sort of outdoor space.  But look at that puppy up above laying on his color-coordinated pillow on that patio that contains very minimal plant life.

That's the dream.  Now let's see where my life actually takes me.

Jordan


Read More »

10/26/14

Pumpkin Cheesecake Muffins


Not that I had a whole lot of say in the matter, but I love that I was born in October.  Fall is my favorite season, and getting to celebrate my birth with a pumpkin themed extravaganza every year is a special treat in and of itself.

If you live anywhere within driving distance of southern Indiana, I highly recommend that you visit Huber's Orchard, Winery & Vineyards.  Yes, there's probably an orchard somewhere much closer.  Trust me - this place is well worth the drive.

As you can see, my friends were super excited to be there!

It is located in Starlight, Indiana, and my family has been going there for years.  They have tons of produce that you can pick yourself or (for the less adventurous types) they also have a market where you can just buy it by the bag (you party poopers, you).  The market is stocked with freshly made breads, pies, soup mixes, every jam and preserve imaginable, candy and an assortment of fruits and veggies.

Also - they bake fresh apple cider and pumpkin donuts.  The smell alone when you walk up is enough to make you gain ten pounds.

In a good way - if that makes sense.

There's also an ice cream shop, grill where you can get burgers and corn on the cob, and a winery.  Many an afternoon has been spent sitting outside next to a cart full of pumpkins, sharing a pitcher of sangria and listening to live music as the leaves fall around you.

Yes, we each got our own pitcher.  Judge all you want.
It really is a magical place.

Now that I'm done sharing my top secret orchard tips with you - pumpkins.  Like many Americans, as soon as the weather dips below 70 degrees, I become obsessed with all things pumpkin.  Candles, cookies, soups, etc.

My favorite? These pumpkin cheesecake muffins.  A sweet pumpkin muffin topped with brown sugar and pecans, with a cheesecake surprise in the center.  Any time I can somehow work cheesecake into my breakfast, I'm a happy camper.

Pumpkin Cheesecake Muffins

PREP TIME: 30 minutes
BAKE TIME: 15 minutes
MAKES: 2 dozen muffins

INGREDIENTS
  • 3 cups all-purpose flour
  • 2 cups sugar
  • 2 teaspoons baking soda
  • 2 teaspoons baking powder
  • 1 teaspoon salt
  • 1 teaspoon ground cinnamon
  • 4 large eggs
  • 1 can (15 oz.) solid-pack pumpkin
  • 1 1/2 cups canola oil
  • Filling
    • 1 package (8 oz.) cream cheese, softened
    • 1/2 cup sugar
    • 1 large egg
    • 1 tablespoon all-purpose flour
  • Topping
    • 2/3 cup chopped pecans
    • 1/3 cup packed brown sugar

WHIP IT UP
  1. Preheat oven to 400 degrees.
  2. In a large bowl, combine flour, sugar, baking soda, baking powder, salt and cinnamon.
  3. In a separate bowl, whisk together eggs, pumpkin and oil.  Stir into wet mixture just until moistened.
  4. Fill greased or paper-lined muffin cups one-third full.
  5. For filling, beat cream cheese, sugar, egg and flour until smooth.  Drop by tablespoonfuls into the center of each muffin.
  6. Top with remaining batter.
  7. For topping, combine pecans and brown sugar; sprinkle over batter.
  8. Bake for 15-18 minutes.
  9. After removing from oven, allow to cool for 5 minutes before removing the muffins from the pan to a wire rack.
  10. Refrigerate leftovers.


I've actually started making these as a Thanksgiving breakfast treat.  We usually try to skip lunch in preparation for the turkey festivities in the evening, so starting off with a pumpkin cheesecake muffin in the morning will hold you over until dinner.  And there's just something wonderful about the smell of baking pumpkin wafting through my house as I watch the parade.

Enjoy!

Jordan


Read More »

10/18/14

Three Cheap & Easy Art Projects

When I first moved out on my own, I was broke.  I mean dead broke.  As in put-my-last-five-dollars-in-my-gas-tank-and-pray broke.

So needless to say - when the time came to decorate my first apartment (and really my first house), I did not have the funds to purchase endless supplies of art to cover the walls.  The only good thing about being this poor in your early years - you become resourceful.

I found that I didn't have to spend a fortune to make things pretty.  Here are several art projects that I completed in my home for under $50.


Working with Scraps

I love scrapbooking.  But I have neither the time nor the patience to actually complete most of my scrapbook projects.  But I loooooove scrapbook paper.  An endless supply of colors and patterns for less than a quarter a page? My budget could definitely handle that.

I purchased a scrapbook paper book that contained 180 sheets of paper in a variety of patterns for $12.  You could just buy individual sheets to fit your specific needs, but I like to change things up occasionally - and I've used the paper for other projects as well.

Next, I found these record album covers on sale at Michaels for $5 each (you can now buy a 3-pack for $10).

So for around $31, I created this in my office:


I swap the scrapbook pages out depending on my mood/the season.  These actually started out in my living room over the couch, but were re-purposed into office décor when I moved into my house.

So not only is this project budget-friendly, it also appeals to those who have a hard time making up their minds. *points finger directly at self*

The Internet is Your Friend

Last Christmas, my best friend got me this really cool print from Etsy that says "My Dog Thinks I'm Cool."  I have no doubt that both of my mutts see me for the dork that I am - but I used the gift as inspiration for a gallery wall in my foyer.


You'll note that the dog print isn't actually on the wall anymore.  I recently listed my home for sale, and didn't want my entryway screaming MULTIPLE DOGS LIVE HERE to any potential buyers.  So I needed to swap out the puppy pictures for something a little more neutral.  This is where the internet becomes your best friend - there are tons of free images available for you to use.

*Note - this does not mean go onto the internet and steal other people's art.  Make sure that anything you are printing is free for your use.

I found this free wall art collage from Smitten on Paper that fit my needs perfectly.  I downloaded the images and messed with the sizing in PowerPoint. I printed the images on cardstock that I purchased for a little more durability.

The picture ledge ($15) and square mirror ($1) are from IKEA.  The red frames ($3) were actually clearance finds from Kohls and the white frames ($4) are Room Essentials from Target.  The largest print and frame were a gift, and the red tea light holders are another re-purposed element. Total project price: $36.50.

Now my entryway is a little more neutral, and I can swap out the images any time that I feel like changing my mind (if you're sensing a pattern here, you're not wrong).

Use Stuff You Already Have

Whenever I get stuck on a decorating project, I usually start looking through my stash.  Everybody has one of these, right?  A box or bin full of stuff that you used to use but put away for a while or those items that you found on clearance but didn't really have any use for at the time.  Surely it can't just be me.

A lot of times it's just me, sitting in a room sifting through old magazines that I just plain can't throw away.  I interned and also worked for a magazine for a few years, and let me tell you something - blood, sweat and tears go into that copy of Martha Stewart Living that you just tossed in the trash.  So my hoarding senses kick in when it comes time to throw away something that I will never read again.  Meaning I have stacks upon stacks of old reading material buried in closets and under all of my beds.

Normally - I would just admit that I have a problem and be done with it.  But squirreling those magazines away actually came in really handy when it came time to decorate my office.

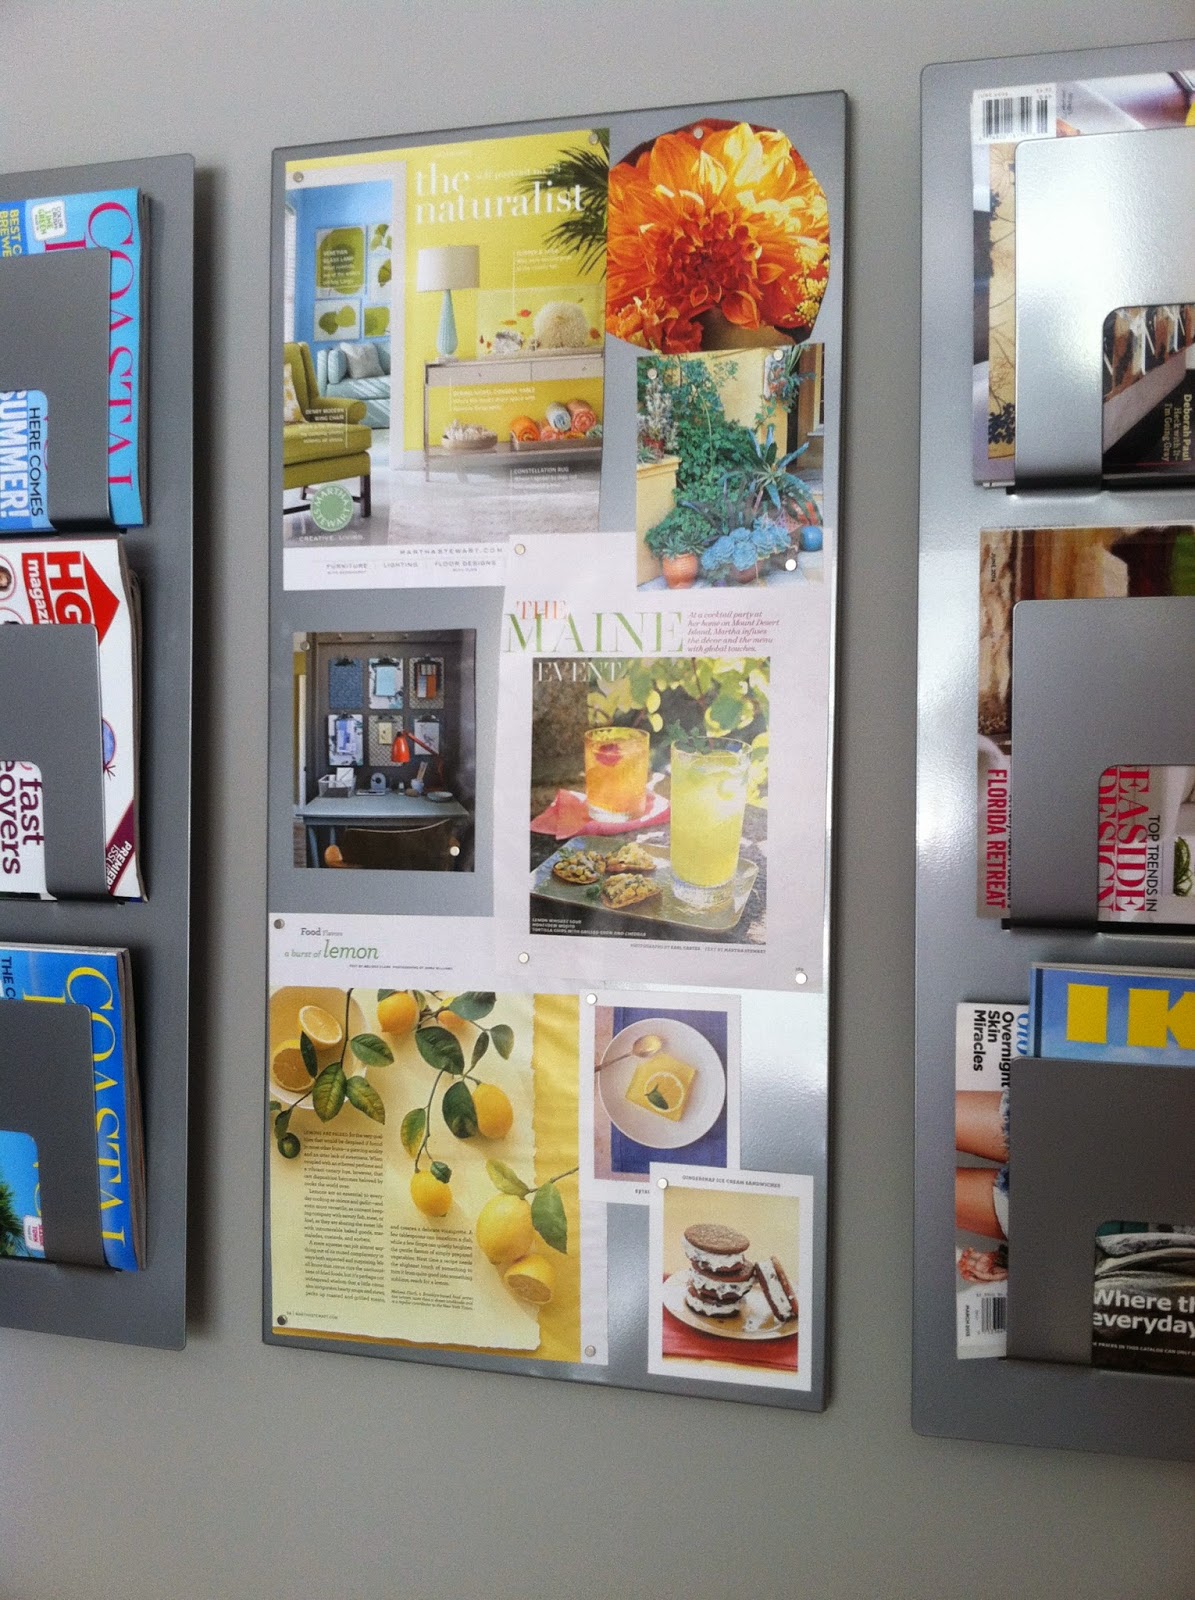
During my second trip to IKEA (and all of its wonder), I came across this example of organizational genius:


I bought two of the magazine racks for $10/each and one of the magnet boards for $13.  The magnets were $13 from The Container Store (you could obviously get these for much cheaper - but I wanted some that were going to be pretty much invisible on my board).  All of the magazines and clippings were free, and I swap them out as inspiration hits me.


Total project cost: $46.


Just because you can't afford to spend tons of cash decorating your home doesn't mean that it can't be stylish and functional.  I've found some of my favorite pieces scouring clearance racks.  It doesn't need to be expensive to have a place in your house.  You just need to love it enough to make it part of your home.

Jordan


Read More »

10/11/14

Cherry Vanilla Oatmeal Cookies


Fall is here!

Well - fall is almost here.  They are still forecasting some 70-degree days here in Indianapolis, but that's still chilly enough to start wearing sweater dresses and boots.  And that's close enough for me.

As soon as the weather becomes somewhat appropriate, I bust out my sweater socks and pumpkin candles (like I haven't been burning them for weeks) and baking season begins.

Yep - and it smells sooooo good.


Lately I have had an obsession with dried cranberries.  Like I could eat an entire bag of Craisins in one sitting.  I have no shame.

I especially love baking with cranberries, dried or otherwise.  But most people would say it's too early for cranberry cookies.  I disagree, but in my attempt to appeal to the masses - I found the next best thing: cherry flavored Craisins.

So in essence, I've lied to you.  These are really "Cherry Juice Infused Cranberry Vanilla Oatmeal Cookies."  But that didn't quite roll off the tongue.  So forgive the deception - and just pretend that there are really dried cherries in these cookies.

Or buy actual dried cherries and use those instead.  Whatever floats your boat.

I'm not normally a huge oatmeal cookie fan - but these are delish.  And because you put the oats in a food processor before adding them to the mix, you get the taste of oatmeal cookies, without the oatmeal cookie consistency.

A sweet, vanilla flavored cookie with the tang of dried cherries (technically cranberries, but still).


PREP TIME: 10 minutes
BAKE TIME: 13-15 minutes
MAKES: roughly 3 dozen cookies

INGREDIENTS

1 cup butter, softened
1 cup brown sugar
1 egg
1 1/2 cups flour
2 teaspoons vanilla extract
1 teaspoon cinnamon
2 teaspoons baking powder
1 1/2 cups oats (chopped in food processor)
1 cup Cherry Craisins

WHIP IT UP
  1. Heat oven to 350 degrees.
  2. In a medium bowl, cream butter and brown sugar with a mixer on low speed.
  3. Add egg and vanilla. Continue to mix on low speed until blended.
  4. In a separate bowl, mix together flour, cinnamon and baking powder.
  5. Add a cup at a time of the dry mixture to the wet mixture, mixing until blended.
  6. Stir in oats.
  7. Stir in Cherry Craisins.
  8. Roll into teaspoon size balls and place on greased cookie sheet.
  9. Bake for 13-15 minutes.


Until it becomes socially acceptable to bake with cranberries, I will continue to lie to all of you and make cookies with cranberries in disguise.  Enjoy!


Jordan


Read More »